After decades of being a freelancer, first as a writer (mainly nonfiction) and now as a writer and illustrator, I’ve streamlined some of my business and creative routines. I’m going to start sharing some of these tips in my blog, in case it helps any other creatives out there. In this post, I’ve summarized my key takeaways on how Canadian freelance creatives can save time and money when sending packages by surface mail.
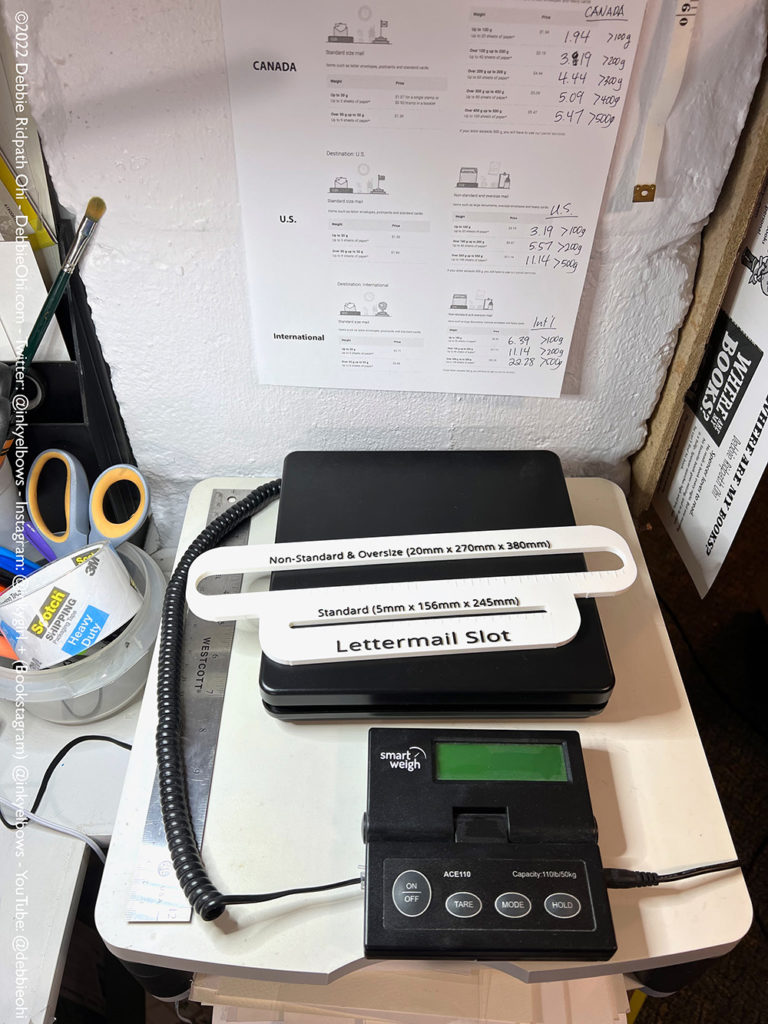
The photo above shows my package mailing set-up. As anyone who follows my Twitter feed knows, I do a LOT of giveaways. Sometimes as part of my book promo, but sometimes just because I enjoy giving stuff away, especially when I’m doing an office studio reorg/purge. I also have an Etsy shop and have art for sale in the Canadian Picture Book Gallery.
For me, the most challenging part in the beginning was trying to figure out mailing supplies, and having to take a package to the post office every time to get things weighed and pay for postage. Needing to rely on a physical post office was a pain (as much as I liked the clerk at our local post office, which is inside a pharmacy around the corner) because it meant I had to take time out of my creative work day to make sure I had all the relevant info with me, package up the item or items, carry the package(s) with me to the post office, often have to line up, sometimes arrive at the post office just to find that there was no one there because they were on a break, have to then either go back home or walk to the next nearest post office – and that involved a much longer walk through a neighbourhood with a lot of construction and noise.
Now, it’s much more straightforward. Here are some tips on how to make it easier to mail packages:

I try to only mail things for which I already have proper packaging. I have found that I can usually mail my small art, bookplates, and bibliophile pendants via one of these 6×8 inch self-seal photo mailers, for example. These mailers cost me CDN .62 a mailer, though, so I’m currently looking for cheaper mailers I can buy in Canada and (ideally) have shipped to me. If anyone has tips, feel free to let me know! I like this type of mailer because it’s self-sealing, has a tear strip to make it easier for the recipient to open, and the white cardboard is easy to write on. When you order your own, do make sure the self-seal adhesive is long-lasting! I’ve ordered some that are not (though the mailers were cheaper), so now I always tape down the edge, just in case.
I assume that my package may end up sitting on someone’s front doorstep, getting rained on. If I’m mailing art, even just a casual doodle, I try to always protect it in something water resistant. I order all my Flap Seal bags and backing boards from ClearBags Canada. I like that you can order smaller quantities if you want. Their customer service is excellent – when I wasn’t sure what sizes of backing boards to get to fit what Flap Seal bags, for instance, I’d put a note in the comments section of my order asking for advice. I would always get a phone call from someone who would give me advice, and sometimes they’d change my order for me – MUCH better than having stuff arrive and me realizing I’d ordered the wrong size!
I have my own postal scale. I ordered this Smart Weigh Digital Shipping and Postal Weight Scale (the one in the photo at the top of this post) years ago and it’s come in SO handy for figuring out how much my packages weigh. Sometimes I’ll weigh a package before I’ve fully packed it, and be able to tweak up or down with more or less items, depending on how close it is to the next Canada Post limit/cost.
I have my own Canada Post Slot Of Doom. I ordered this via Etsy from VoxelPrints. Any Canadians out there who take a somewhat bulky envelope to the post office will be familiar with the clerk trying to fit their mailer through the Slot Of Doom (not the official name ?) to see whether it can be mailed via the MUCH cheaper Letter/Document rates, if it needs Oversized rates, Small Package rates, etc. YOU WILL SAVE YOURSELF A LOT OF MONEY IF YOU CAN MAIL VIA LETTER/DOCUMENT RATE. You’d be surprised at what you CAN mail with the latter rate, even if you have to send it as an Oversized letter/doc.
I took the time to learn about different types of Canada Post rates, shipping, etc. For years, I never bothered. I still have a lot to learn, plus Canada Post rates/shipping policies do change sometimes, but I’ve learned enough to realize that by adjusting what and how I send, I can save myself a lot of hassle and money in the longterm. I advice bookmarking the Find A Rate area of the Canada Post site. I also advise experimenting a bit, typing in various postal codes, different sizes, etc. I learned a lot doing this!
I signed up for a Solutions For Small Business account. Again, something I ignored for years but finally decided to sign up and wished I had done it ages ago. It’s free to sign up, but you can get access to many resources and discounts (small discounts, but they add up) on shipping. Plus you’ll get notifications about special promo offers, like their annual Free Shipping Tuesdays in October. Today, for example, I received my Free Shipping Tuesdays promo codes that will enable me to ship two packages for free – one within Canada and one to the U.S.
I use Snap Ship to mail my packages. Once I’m logged into the Canada Post site, I go to Snap Ship to create mailing labels for my parcels. Once I click on the “Create new shipment” button, I’m prompted for all the relevant info. I pre-weigh my package so I have that info handy. I also make sure there’s a ruler handy so I can measure the dimensions. Before paying, I can choose between different types of shipping methods/costs. After payment, I’ll get a PDF of the shipping label(s) – I print those out and attach them to my mailers with clear packing tape, then save the PDF receipt for my tax records. The labels are valid for 5 days, so if I know I have several packages to mail, I’ll sometimes wait a day or two before going to the post office. At my local post office, I can skip the regular line-up and just leave it on the counter in a special area just for this type of already-prepped package. I have the option of asking the clerk for a receipt, but I usually just make sure they SEE me leave the package and then I go back home.
And if the package is small enough, I can just put the prepped mailer/pkg directly into a mailbox without having to line up at the post office at ALL. This came in super-handy earlier in the pandemic.
Speaking of the pandemic, before mailing a package overseas, check to see what the postal service is like in the destination country. Earlier in the pandemic, there were some countries that were pretty much holding all surface mail at the border. Some (like parts of China, I think?) even now have a huge delay on surface mail; one educator I offered to mail a doodle told me not to bother, because it was likely to take many months to reach them.
I hope this helps some of you Canadian freelancers out there! Comments? Questions? Do you have your own tips? I’ll leave comments open for a couple of weeks if you’d like to post below.